
Introduction
The night of 31st January 2018 was special as it was a Total Lunar Eclipse and it was also a Supermoon, Blue Moon and Blood Moon !
Of the four, the first two have a physical basis i.e. the moon transiting the Earth's shadow and it being at the perigee (closest to the Earth) of its orbit. The third is an artefact of the Gregorian Calendar being used by most of the world and the fourth would seem redundant as the moon would appear reddish in all total eclipses, due to Rayleigh scattering, I presume :)
Vital Stats
Location - Ahmedabad, western India.
Totality Start - 18:22
Sunset - 18:27
Totality Middle - 19:00 +7 deg above the horizon.
Totality End - 19:38 +15 deg above the horizon.
Photographing the eclipse
My gear consisted of a full-frame Nikon D750 DSLR and Nikon 200-500mm lens mounted on a tripod. Image Stabilization (VR) was switched Off. Shutter release was via Remote with Mirror Up to prevent camera shake due to mirror slap. I shot in Shutter Priority Mode, lens wide open at f/5.6 and set to 500mm. I got a rough idea of the required exposure from the online calculator here - http://xjubier.free.fr/en/site_pages/LunarEclipseExposure.html
Considering that the total eclipse started at 18:22, a bit before sunset (18:27), I hadn't much hope of capturing the first half of totality. I checked the direction of moonrise from the Stellarium app on my phone and luckily, it fell between two tall buildings and a tree !
I was all set up by 19:00 (the middle of totality) but still couldn't see any moon. This was due to the low elevation of the moon (+7 degrees above the horizon), a bit of twilight light, skyglow due to city lights and the airport and finally haze due to pollution.
I got my first sighting at 19:15. In fact I couldn't see it with the naked eye nor through the camera optical viewfinder but I suddenly got a glimpse of it when I turned on LiveView in the camera. I guess I couldn't see it directly due to the extremely low contrast between the moon and the sky, but which was seen in the LiveView LCD due to the screen's increased contrast. Right after that I photographed my first shot shown below.
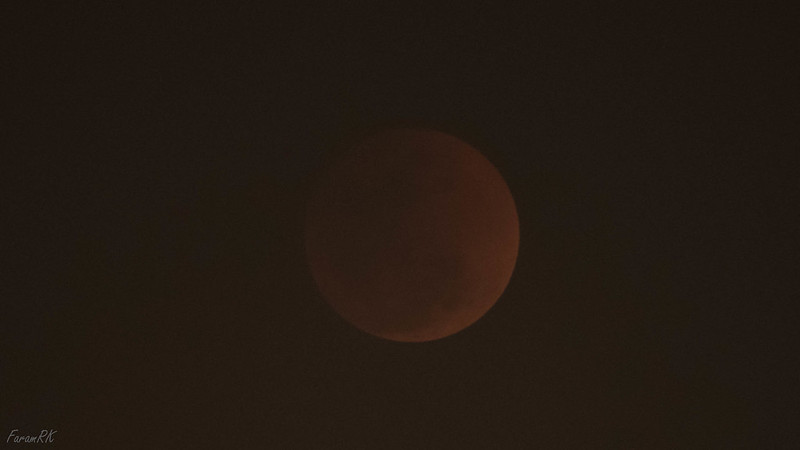
Initially, it was not possible to autofocus on the moon due to it being very dim with very low contrast. So I had previously set the focus to infinity by focussing on a bright star. I was able to autofocus on the star through the optical viewfinder and I could also focus manually on it by zooming in on the LiveView image on the LCD. Once I did that, I let the lens focus mode remain at M and was careful not to disturb the focus ring.
Auto exposure didn't work so I just eyeballed the shot image and adjusted exposure manually. I was careful not to use shutter speeds slower than the one suggested by the aforementioned online eclipse calculator (1/2.5 second for my camera and focal length) in order to minimize motion blur due to the moon's movement.
My technique was to centre the moon in the viewfinder by adjusting the the tripod head's roll and pitch then press the remote release to pull up the mirror, wait at least 5 seconds for the vibrations to die down, then press the remote again to take the shot.
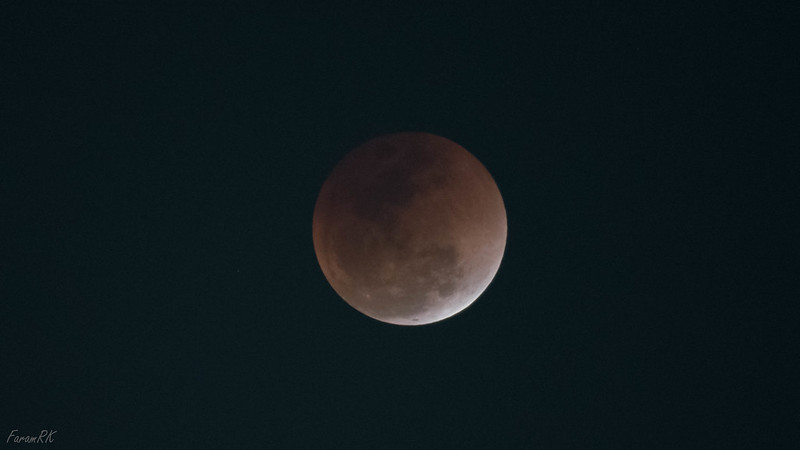
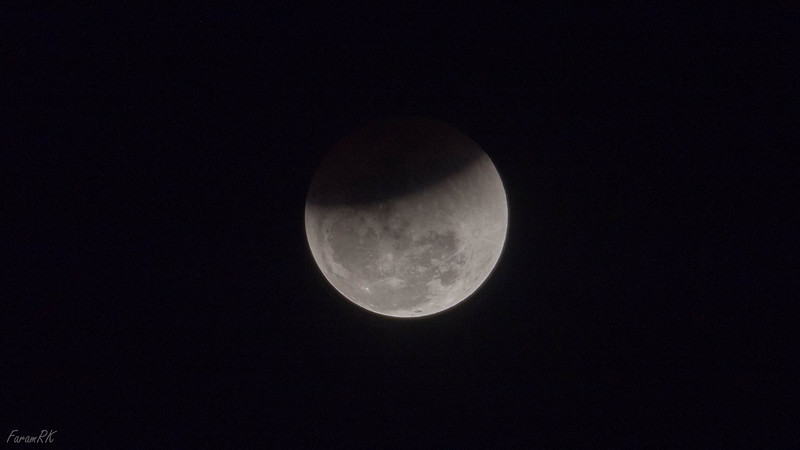
I kept taking shots every few minutes or so. Here's one at the end of totality -
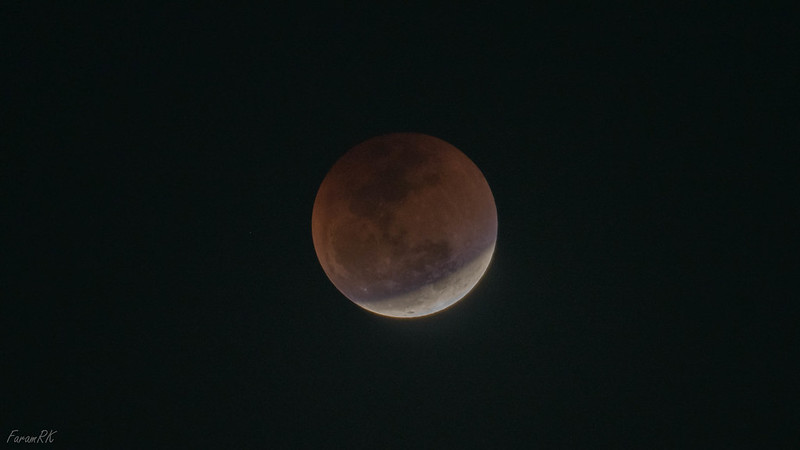
Here's one about 11 minutes after totality ended -
By this time I was able to use various metering modes on the camera, though I found Spot metering to work the best. I also tried various exposure compensations at this stage from 0 EV to -4 EV in an effort to prevent blown out highlights of the parts exposed to sunlight. I found that -2 EV gave the best results giving enough details in the sunny areas without too much noise in the shaded areas due to lifting up the shadows in post processing. Actually, the post processing technique that worked was to boost up the exposure of the whole image until the shadowed areas looked reasonably good (and what I perceived my eyes had seen), then I lowered the highlights slider to bring back definition in the sunlit areas. Autofocus started working as normal.
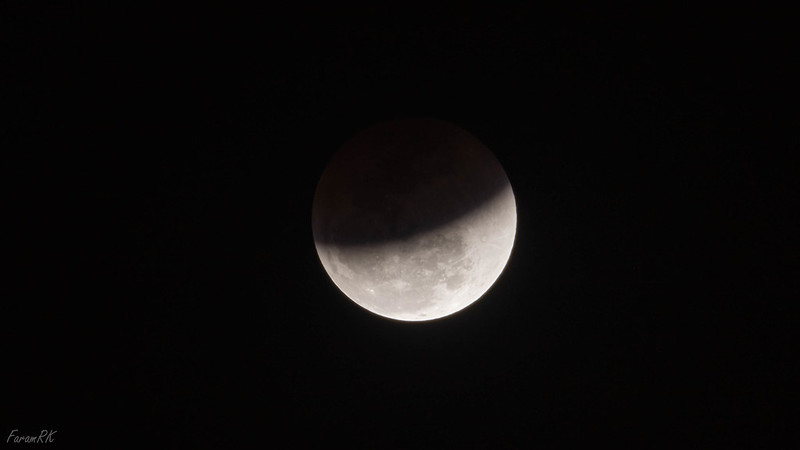
Another one as the moon travelled more and more out of the Earth's shadow -
And here's my final shot of the partial eclipse. By now I had dismounted my camera from the tripod and shot handheld -
I also shot a few video clips. Here's one during totality -
I needed to shoot at the lowest possible frame rate (24 fps in my case) to allow the slowest possible shutter speed to be used, to get an acceptable exposure. There are a couple of more clips of the partial eclipse on my YouTube channel.
Here's the Flickr album of my eclipse shots - https://flic.kr/s/aHskvxjNKS.
If you have any questions, please ask in the comments below.
No comments:
Post a Comment